
Frostpunk 2's Prologue serves as an introduction to the game's most foundational mechanics, and players will become familiar with Frostbreaking, Districts, and more as they work to complete it. While the in-game tutorials do provide information about these mechanics, some fans may require further elaboration. That is exactly what can be found in this walkthrough, and it should make it easy for players to complete the Prologue in Frostpunk 2.
While it is recommended that players carefully follow the approach that is detailed in this walkthrough, minor deviations should not cause too many issues.

Frostpunk 2: How Long to Beat (& How Many Chapters)
Players who have questions about the length of Frostpunk 2's campaign, and about its open-ended game mode, can find answers here.
Frostpunk 2: Prologue Tips

Before diving into a complete walkthrough of Frostpunk 2's Prologue, here are some general tips that may be helpful:
- Do not forget to build two Food Stockpile Hubs as soon as Food surplus is achieved. This will increase the player's Food Stockpile Capacity to a suitable level.
- Make sure to build an Extraction District on a second Construction Wagon. The first Construction Wagon cannot supply enough Prefabs to support all the actions that the player must take during the Prologue.
- Destroy Districts when the tiles that they are harvesting run out of resources to get some additional Prefabs and Scraps.
- Turn off a District to free up Workforce for construction or Frostrbreaking, and then reactivate the District when the construction is complete.
- If a player needs more Scraps, they can click on the Wanderers at the bottom of the screen, click on the Favours tab, and click on "Take Scraps."
Frostpunk 2: Prologue Walkthrough
Fight the Cold
- Frostbreak to an Oil Wagon and Construct an Extraction District
Frostpunk 2 players should begin by clicking on the Frostbreak circle in the bottom-right corner of the screen. This action will cause several tiles near the Dreadnought Wreck to illuminate, and it will also reveal the positions of resources on the map.
Strategy game fans should now click on an illuminated tile that is near an Oil Wagon (represented by an oil barrel icon). This action will extend the illuminated tiles in the direction of the Oil Wagon, and players should continue clicking tiles until they have selected a total of eight (at least one of which should be an Oil Wagon tile). A check mark will appear as soon as eight tiles have been selected, and fans should click on it to start Frostbreaking.
Once Frostbreaking is complete, players will have the ability to build an Extraction District on the tiles that they cleared. To do this, fans of city-builders should simply click on the District circle in the bottom-right corner of the screen, click on Extraction District, and then click on the cleared Oil tile. Players must now click on two adjacent tiles to make a check mark appear, and clicking on that symbol will initiate construction of the Extraction District.
- Turn on the Furnace in the Dreadnought Wreck to provide Heat
Players who look at the Resource Drawer at the top of the screen will now find that they are producing Oil, and that fuel can be converted into Heat in Frostpunk 2 by burning it in the Dreadnought Wreck's Generator. To initiate this burning, fans should click on the Dreadnought Wreck, click on "Generator" at the bottom of the information pane that appears, and then click the toggle that is beneath "Generator Off."
Provide Basic Infrastructure
- Frostbreak to a Construction Wagon and Build an Extraction District to Provide Prefabs
Players must now repeat the process that they used to start extracting Oil from the Oil Wagon, though this time they must Frostbreak to, and build an Extraction District on, a Construction Wagon. Again, this process begins by clicking on the Frostbreaking circle in the bottom-right corner of the screen, and players can start the job once eight tiles have been selected.

To reiterate, the Extraction District needs to be placed atop a Construction Wagon tile, which is represented by a rectangular symbol. As such, players must make sure that they clear one of those tiles when Frostbreaking.
- Build 2 Housing Districts
With the Prefab-producing Extraction District underway, players can set their sights on building two Housing Districts. As with Extraction Districts, Housing Districts are built by clicking on the Districts circle in the bottom-right corner of the screen, clicking on Housing District, clicking on the requisite number of Frostbroken tiles (six in this instance), and then clicking on the check mark that appears.
To note, one Housing District can be built next to the Generator without any Frostbreaking. However, survival game fans must Frostbreak some additional tiles to create the room that is required for construction of a second Housing District. It is also important to mention that the Heat demand of a Housing District is decreased if three of its tiles are adjacent to either the Generator or another Housing District, incentivizing players to build them close to one another.
Gain Access to Food
- Frostbreak to Fertile Soil & Build a Food District on Fertile Soil

Players should now Frostbreak to Fertile Soil tile, which is represented by a plant icon. Once such a tile has been Frostbroken, players should click on the Districts circle in the bottom-right corner of the screen, click on Food District, and build it atop the Fertile Soil.
Maintain Infrastructure

Around Week 30, an event will occur that focuses around gathering Materials to reduce Squalor in Frostpunk 2. It is recommended that players select "Promise to Gather More Materials" during this event, and then use this information to complete the task that they receive:
- Build an Extraction District on a Maintenance Wagon & Extract Enough Materials to Satisfy Your Districts' Demand

Players must now Frostbreak to a Maintenance Wagon (represented by a cube symbol) and build an Extraction District upon it. Fans of post-apocalyptic games will be quite familiar with this process by now, though they may need to perform several rounds of Frostbreaking to reach a Maintenance Wagon.
Prepare for the Whiteout
- Stockpile Enough Food to Survive the Whiteout

Players must now turn their attention to stockpiling 40,000 Food. However, the single Food District that has been established does not have enough Food output to generate that stockpile, and fans will need to take action if they want to be prepared for the Whiteout. Here are the options that are available to them, and players should continue taking action until the text near the top-left corner of the screen indicates that the stockpile will be ready before the Whiteout arrives:
- Frostbreak to, and establish Food Districts on, additional Food tiles. It is recommended that players build two additional Food Districts, one of which should be placed on the Seal Colony in the bottom-left corner of the map.

- Use the "Emergency Shifts" ability in Food Districts to increase their output. To use this ability, players should click on a Food District and click on the "Emergency Shifts" circle at the bottom of the information pane.

- Instruct the Wanderers to "Tighten Belts." To perform this action, players should click the Wanderer at the bottom of the screen and then click "Tighten Belts."

- When the "Whiteout Draws Near" event occurs around Week 65, slaughter the seals or let the Elders go.
To note, there are two additional actions that players should take while working to improve their Food output:

- Frostbreak to a second Construction Wagon and build an Extraction District upon it. This action will guarantee that the player has access to the Prefabs that they need.

- Build two Food Stockpile Hubs to increase Food Stockpile Capacity to the requisite 40,000. To build these Hubs, fans should simply click on the Hubs circle in the bottom-right corner of the screen, select Food Stockpile Hub, and then click on any Frostbroken tile on the screen.
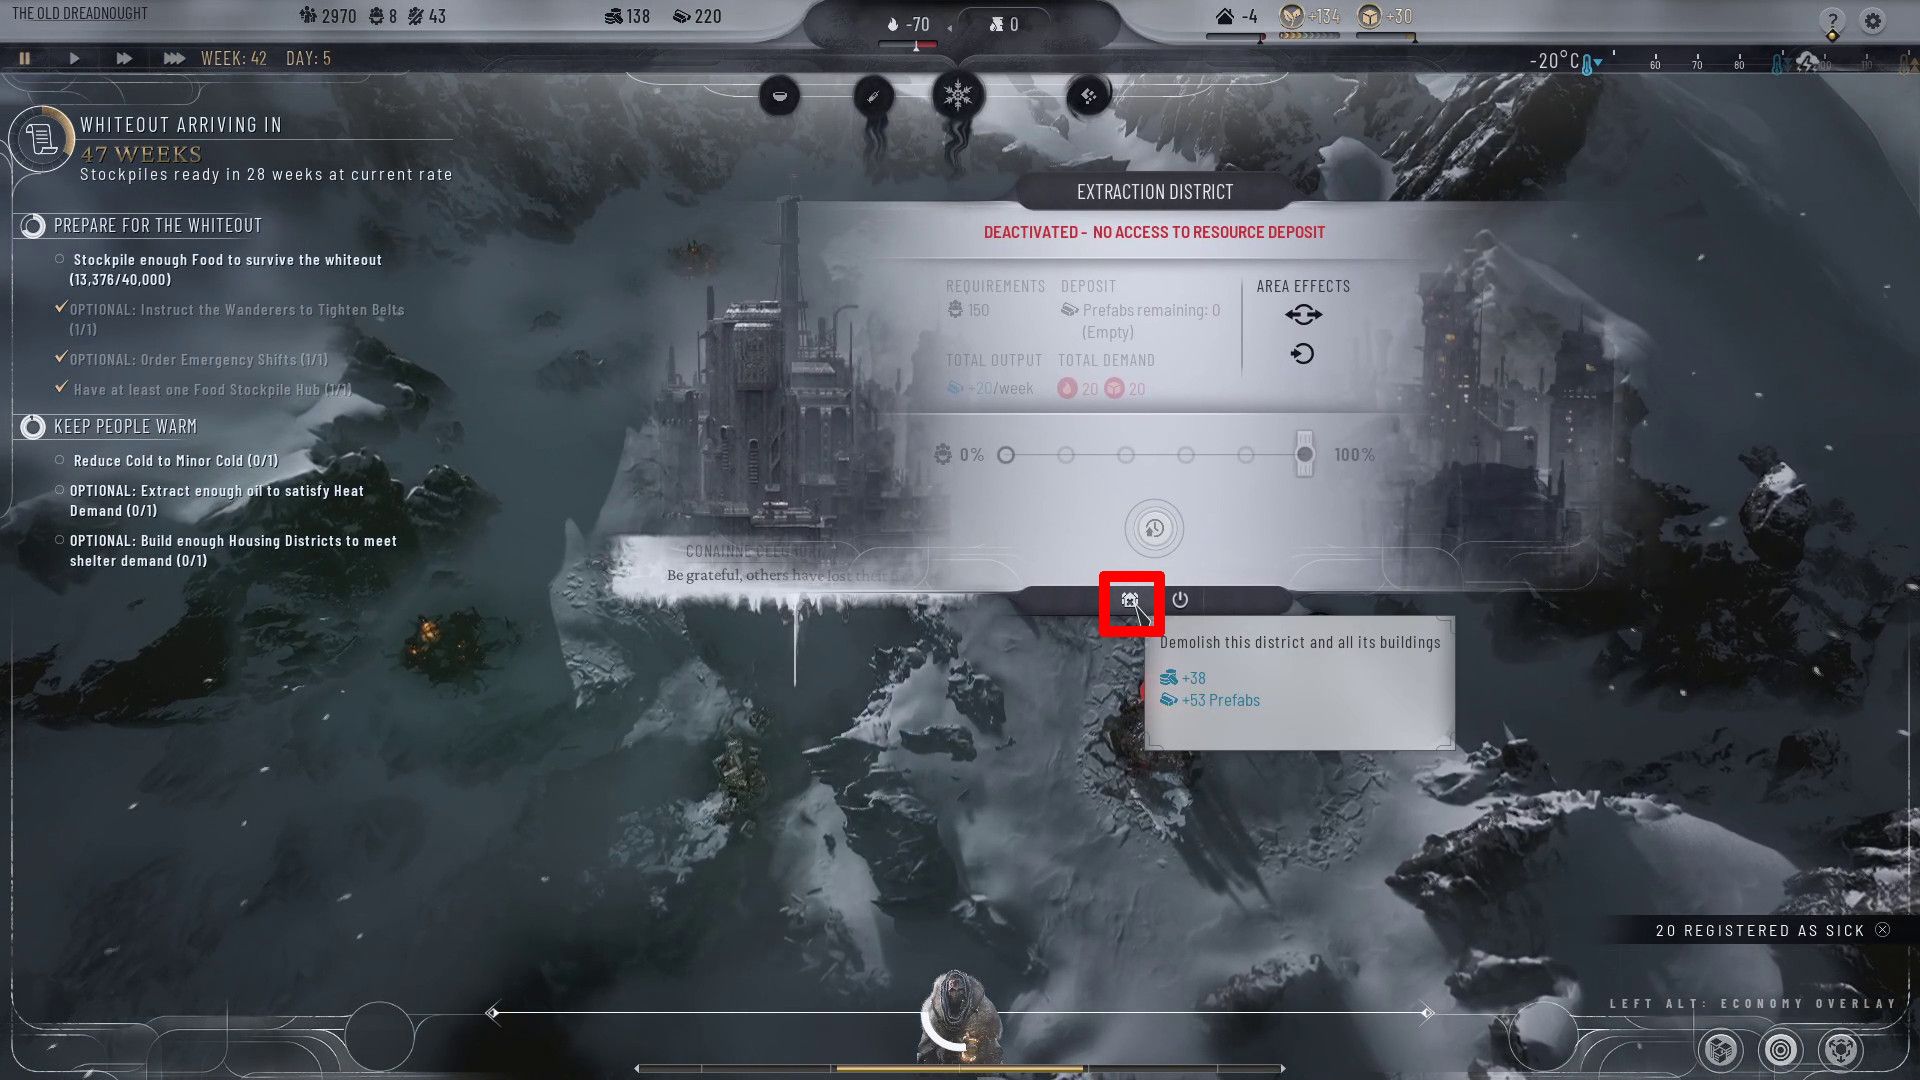
The first Construction Wagon will run out of Prefabs around Week 40. When that occurs, players should demolish the Extraction District that sits upon it to gain some Prefabs and Scraps in Frostpunk 2.
- Wait for the Whiteout to Hit
Once 40,000 Food is stockpiled, players should simply wait for the Whiteout to arrive, and the Prologue will end shortly after that occurs.
Keep People Warm

While stockpiling Food, players will encounter an event that centers around providing sufficient Heat and Shelter. Fans should select "Provide Heat and Shelter" during this event and then take these actions:

- Build one additional Housing District to meet Shelter demands.
- Build two additional Extraction Districts on Oil Wagons, and activate the "Emergency Shifts" ability in one of them, to meet Fuel demands.
Players may find that they have an insufficient Workforce as they pursue these tasks. Fans should be able to rectify this issue by destroying the Extraction District that they built on the second Construction Wagon, which should be almost out of resources.

Frostpunk 2
- Released
- September 20, 2024


WHERE TO PLAY


- Developer(s)
- 11 Bit Studios
- Platform(s)
- PC, PlayStation 5, Xbox Series X, Xbox Series S
- Genre(s)
- Strategy, Survival, City Builder