

There are a handful of Silksong achievements that are extremely hard to get, like Steel Soul or the uniquely challenging Cursed trophy. One of the most intimidating is the Speedrunner trophy, which tasks players to beat the game in under 5 hours. Though this might seem tough, if you know where to go and what to prioritize, any player can beat Silksong within this strict time limit.

Hollow Knight: Silksong - Interactive Map (Pharloom)
Our interactive map for Pharloom in Hollow Knight: Silksong. All the skills, tools, benches, and more found in the game.
This guide provides a list of everything you must get to speedrun Silksong in under 5 hours, and offers a step-by-step explanation of the optimal speedrunning route Silksong players can follow that leads Hornet to the final boss as fast as possible. Just try not to die, or you'll lose a lot of time backtracking to your cocoon.
Going off the main path to get optional upgrades and abilities can actually save you time in the long run – more Needle damage makes fights easier, and the Faydown Cloak makes platforming sections significantly less frustrating.
Updated October 6, 2025 by Erik Petrovich: About a month after its initial launch, many players have beat the true Act 3 ending in Silksong and are going back to complete other requirements and unlock every achievement. One of the toughest achievements to get is the Speedrunner Silksong achievement, which requires players to beat the game in under 5 hours. This requires you to follow a very specific route and complete specific prerequisites – like five Bell Benches that must be activated throughout Pharloom. Though most Bell Benches are in your main path, two areas feature Bells that are a bit more out of the way: Greymoor and Shellwood. This guide to speedrunning Silksong has been updated with a revised route that includes all Bell Bench locations, which were left out of the original version of this walkthrough.
Everything You Need to Do to Beat Silksong in Under 5 Hours
List & Locations of Everything Required to Speedrun Silksong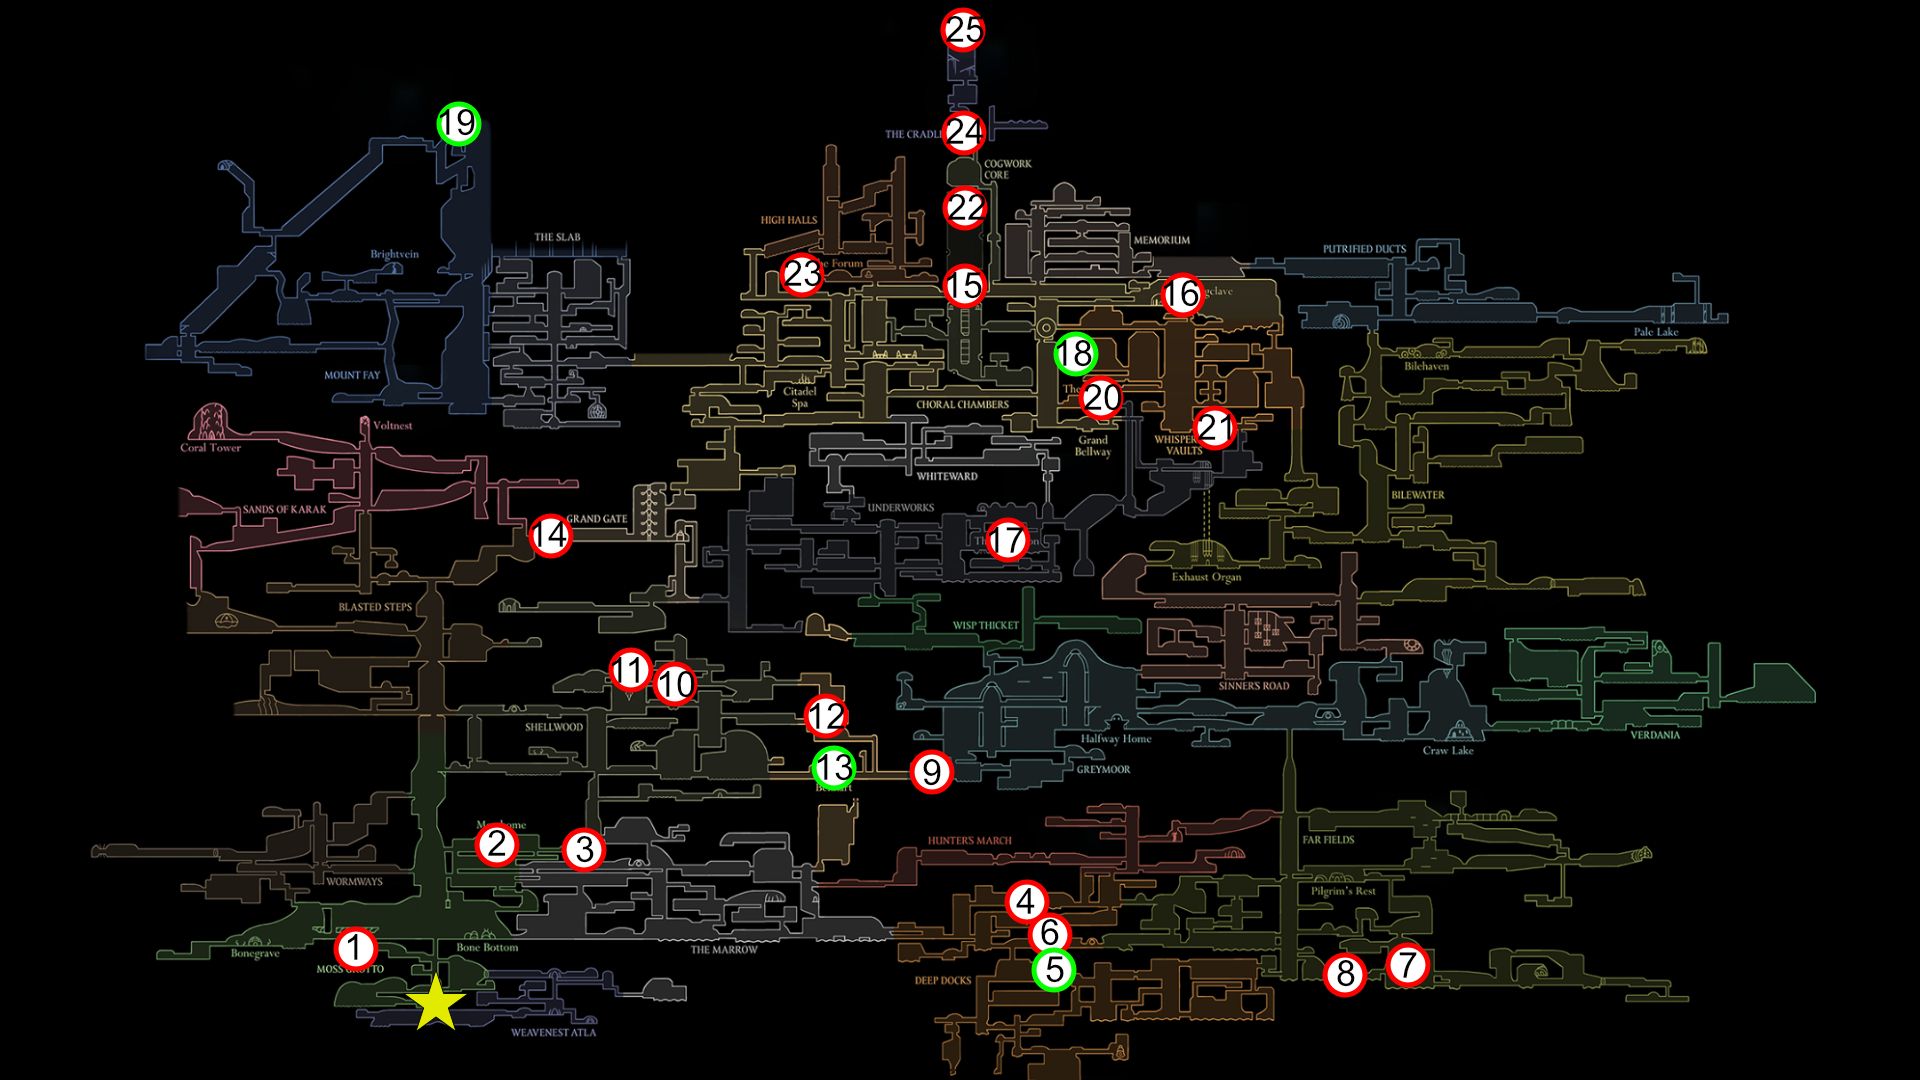
|
Map Marker |
Name |
Type |
|---|---|---|
|
✰ |
START LOCATION |
- |
|
1 |
Moss Mother |
Boss |
|
2 |
Silkspear |
Ability |
|
3 |
Bell Beast |
Boss |
|
4 |
Swift Step |
Ability |
|
5 |
Forge Daughter |
Optional Tool vendor |
|
6 |
Lace |
Boss |
|
7 |
Drifter's Cloak |
Ability |
|
8 |
The Fourth Chorus |
Boss |
|
9 |
Moorwing |
Boss |
|
10 |
Sister Splinter |
Boss |
|
11 |
Cling Grip |
Ability |
|
12 |
Widow / Needolin |
Boss / Ability |
|
13 |
Needle Upgrade #1 |
Optional Upgrade |
|
14 |
The Last Judge |
Boss |
|
15 |
Cogwork Dancers |
Boss |
|
16 |
White Key |
Key Item |
|
17 |
Clawline |
Ability |
|
18 |
Pale Oil #1 (Needle Upgrade #2) |
Optional Upgrade |
|
19 |
Faydown Cloak |
Optional Ability |
|
20 |
Trobbio |
Boss |
|
21 |
Vaultkeeper's Melody |
Key Item |
|
22 |
Architect's Melody |
Key Item |
|
23 |
Conductor's Melody |
Key Item |
|
24 |
Lace |
Boss |
|
25 |
Grand Mother Silk |
Final Boss |
Silksong Speedrun Route Step-by-Step Explanation
Optimal Silksong Speedrun Route to Get the Speedrunner Trophy

-
1: Begin the game by making your way through the linear Moss Grotto, beat Moss Mother, then get to Bone Bottom.
- Go to the right of Bone Bottom to enter The Marrow.
- Open the shortcut door, then go right and up through a gap in the ceiling.
-
2: Go left at the top to find Shakra, then go up and left to enter the top of Moss Grotto.
- Get the Silkspear ability, then go back down, unlock the elevator shortcut to Bone Bottom, then go up and right to get back into The Marrow via the exit above the elevator.
-
3: Free the Bell Beast with Silkspear, then subdue it.
- Go right from the Bellway to reach the first required Bell Bench. Hit the lever to ring the bell at B1, rest on the bench, then continue to the right.
- At the far right side of the Marrow, drop down and continue generally rightward to get to Deep Docks.

-
4: Go up from Shakra's location, then right for two rooms, and up again to enter a small Gauntlet with Skarr enemies.
- Drop down to the left and continue left to get the Swift Step ability.
-
5: Optionally, drop down below the room with Shakra and meet the Forge Daughter.
- You can find a Craftmetal to the far right of the Marrow Bellway.
- Get the Sting Shard from the Forge Daughter, which is incredibly useful against a variety of flying enemies, especially in the High Halls Gauntlet.
-
6: Use the Swift Step ability to leap up to a lever that will open the boss door to Lace.
- Defeat Lace, then continue to the right and activate the second required Bell Bench.
- Hit the lever to ring the bell at B2, then go to the right to enter the Far Fields.
-
7: Continue rightward in the Far Fields, then drop down the central room full of wind funnels to find an exit on the bottom-right.
- Continue to the right until you find the Seamstress. Complete the Seamstress' quest to unlock the Drifter's Cloak, which allows Hornet to float.
-
8: Go to the left from the Seamstress' hut to fight the Fourth Chorus on your way back to the central room full of wind funnels.
- Ride the wind funnels upward with the Drifter's Cloak, and destroy explosive growths on the way to free more wind funnels and continue up.
- When you can fly up no further, go into the exit at the top of the shaft to enter Pilgrim's Rest.
- Go back to the shaft via the exit on the top-left, just above the entrance to Pilgrim's Rest, to continue upward and break through the ceiling into Greymoor.

-
9: First, go right to activate the Bell. Then, go left to make your way to the Halfway House.
-
You must defeat the Craw enemies and the gauntlet to the right of the Greymoor entrance, further right from Shakra's location, then loop back to get to the third Bell Bench.
- Alternatively, you can return to Greymoor after getting Cling Grip in Shellwood to more easily reach this Bell Bench without dealing with the Craw gauntlet.
- Either way, this Bell is required to enter Act 2 via the Last Judge, so just make sure to loop back and ring the Bell Bench at B3 at some point after reaching Greymoor.
- Continue left until you reach the Halfway House. Sit at the bench here, then continue to the left through the ruined buildings of Greymoor until you reach Moorwing in the bottom-left of the zone.
- Defeat Moorwing to get to Bellhart and enter Shellwood further to the left.
-
You must defeat the Craw enemies and the gauntlet to the right of the Greymoor entrance, further right from Shakra's location, then loop back to get to the third Bell Bench.

-
10: In Shellwood, make your way to the top of the first room by looping left, then upward to the right, then left again.
- In the next room, drop down, then go up and unlock the central Bench in Shellwood.
- Then, continue to the left to find an elevator. Ride this down, then go left until you find a tall room full of white flowers.
- Use these to climb upward, then go right to find another elevator.
- Unlock this shortcut, which leads down to the central Bench, then go right. Navigate this room to get to the top-left exit to reach Sister Splinter.
-
11: Defeat Sister Splinter, then go left and make your way around the central pillar to get to the top-left side of this room.
- Enter this room, then hit the white flowers and jump as you loop left, then right to reach the top right exit (above the room entrance).
- Unlock the Cling Grip skill via the weaver statue in the next room, then continue to the right.
-
12: Make your way back to the central Bench, then go up and to the right as you use your new Cling Grip ability to wallclimb to the Bellway tunnels above Bellhart.
- Make your way down to fight Widow. Defeat Widow to get the Needolin ability and free Bellhart.
- Activate the fourth Bell Bench immediately after the Widow boss fight. Hit the lever to ring the bell at B4, then continue back into Bellhart.
- Activate the fifth and final Bell Bench in the top-left area of Shellwood, to the left of the Bellway. To get here, go all the way to the bottom-left of Shellwood, then take the shaft upward and go right. You will end up on the left side of the Bellway – ring the bell at B5 to complete the requirements to activate the Last Judge boss fight.
-
13: Optionally, after freeing Bellhart, find Pinmaster Plinney in his hut at the top level of Bellhart.
- Get the first Needle Upgrade here; though it may take a minute or two of extra time to get back through Shellwood the long way, it's well worth the damage increase.

-
14: After defeating Widow, go all the way to the top-left side of Shellwood to enter the Blasted Steps.
- Make your way through this zone with a combination of your movement skills until you reach the Bench at the top of the zone.
- Make your way to the entrance to the Citadel to the right of this Bench, then defeat The Last Judge to enter Act 2.

-
15: Drop down into the Underworks and make your way through this zone to re-enter the Choral Chambers.
- Go up, then right along the gently sloping long hallway. In the next room, take the top-left exit, then go all the way up the next room to find a Bench at the far top-left side of the Choral Chambers.
- Go to the right from this bench to face the Cogwork Dancers and get the Pharloom's Crown quest, which charges Hornet to locate the three pieces of the Threefold Melody.
-
16: Go to the right from the Cogwork Dancers boss room to unlock Songclave at the First Shrine, in the far top-right of the Choral Chambers.
- Look for the White Key in this zone, which is required to enter the Whiteward.
-
17: Go back to the White Key elevator and unlock it. Make your way through the Whiteward until you reach its bottom-right exit to enter The Cauldron.
- Drop down, then go left above a weaver statue surrounded by lava in a blocked-off room below. Loop down, right, then back up to reach this room and unlock the Clawline ability.
-
18: Optionally, enter the Whispering Vaults via the Cogwork Core, which itself can be accessed by dropping below the Cogwork Dancers boss arena.
- Go to the top-right of this area to get to the left side of the large wheel gate.
- Open the way leading right by hitting the lever, then make your way down and take the first exit on the left side.
- Continue to the top-left of this room to unlock a shortcut back to the Choral Chambers and acquire a Pale Oil, which will let you get the second Needle upgrade.

-
19: Optionally, enter The Slab from the left side of the Choral Chambers, then make your way to the bottom to enter Mount Fay.
- If you can make it to the top of Mount Fay, you will get the Faydown Cloak, which lets Hornet double jump. This is an incredibly helpful ability that will save time in other parts of the run, but is not technically required.
- If you feel confident that you can get this within the 5-hour time limit, use your Clawline to enter the zone to the left of The Slab Bellway.

-
20: At the bottom-left of the central main room in the Whispering Vaults, take the exit that leads to The Stage.
- Unlock the shortcut back to the Choral Chambers, then sit at the Bench in the Grand Bellway.
- Go into The Stage to challenge Trobbio. After beating this boss, take the exit to the bottom right of the boss arena to drop into the Underworks.
-
21: Make your way to the top-right through this section of the Underworks until you re-emerge into the Whispering Vaults.
- Pick up the Sacred Cylinder, then look for Vaultkeeper Cardinius a few rooms above the exit from the Sacred Cylinder room.
- Give the Sacred Cylinder to Vaultkeeper Cardinius to unlock the Vaultkeeper Melody.
-
22: From the Cogwork Dancers boss arena, drop down, then loop to the top-right side of this room to find the entrance to a sub-zone.
- Use your Clawline and movement skills to grapple onto the hook and ride around this room, then take the exit on the top-left. You will reach the top half of the Cogwork Core.
- Carefully platform through the room to make it to the top-left side, where you can solve the Architect puzzle and earn the Architect Melody.
-
23: From the bench in the top-left side of the Choral Chambers, use your Clawline to grapple your way upward and enter the High Halls.
- Platform around this zone, using your Drifter's Cloak and Clawline in tandem with one another to safely avoid spikes, until you reach the bottom-right side of the subzone.
- Sit on the bench here, then go left to enter the High Halls Gauntlet.
- Beat the Gauntlet to learn the Conductor's Melody from Conductor Ballador.

-
24: Return to the Cogwork Dancers boss room and play the Threefold Melody for the ancient statues.
- Take the elevator upward to find and fight Lace for the second time.
- Defeat Lace to continue progressing upward into The Cradle.

-
25: Make your way to the very top layer of The Cradle to challenge Grand Mother Silk.
- Beat this final boss of Act 2 within the time limit to earn the Speedrunner achievement in Silksong!

Hollow Knight: Silksong
- Released
- September 4, 2025

WHERE TO PLAY


- ESRB
- Everyone 10+ / Fantasy Violence, Mild Blood
- Developer(s)
- Team Cherry
- Franchise
- Hollow Knight
- Number of Players
- Single-player
- Platform(s)
- PlayStation 5, PlayStation 4, Xbox Series X, Xbox Series S, Xbox One, Nintendo Switch 2, Nintendo Switch, PC