

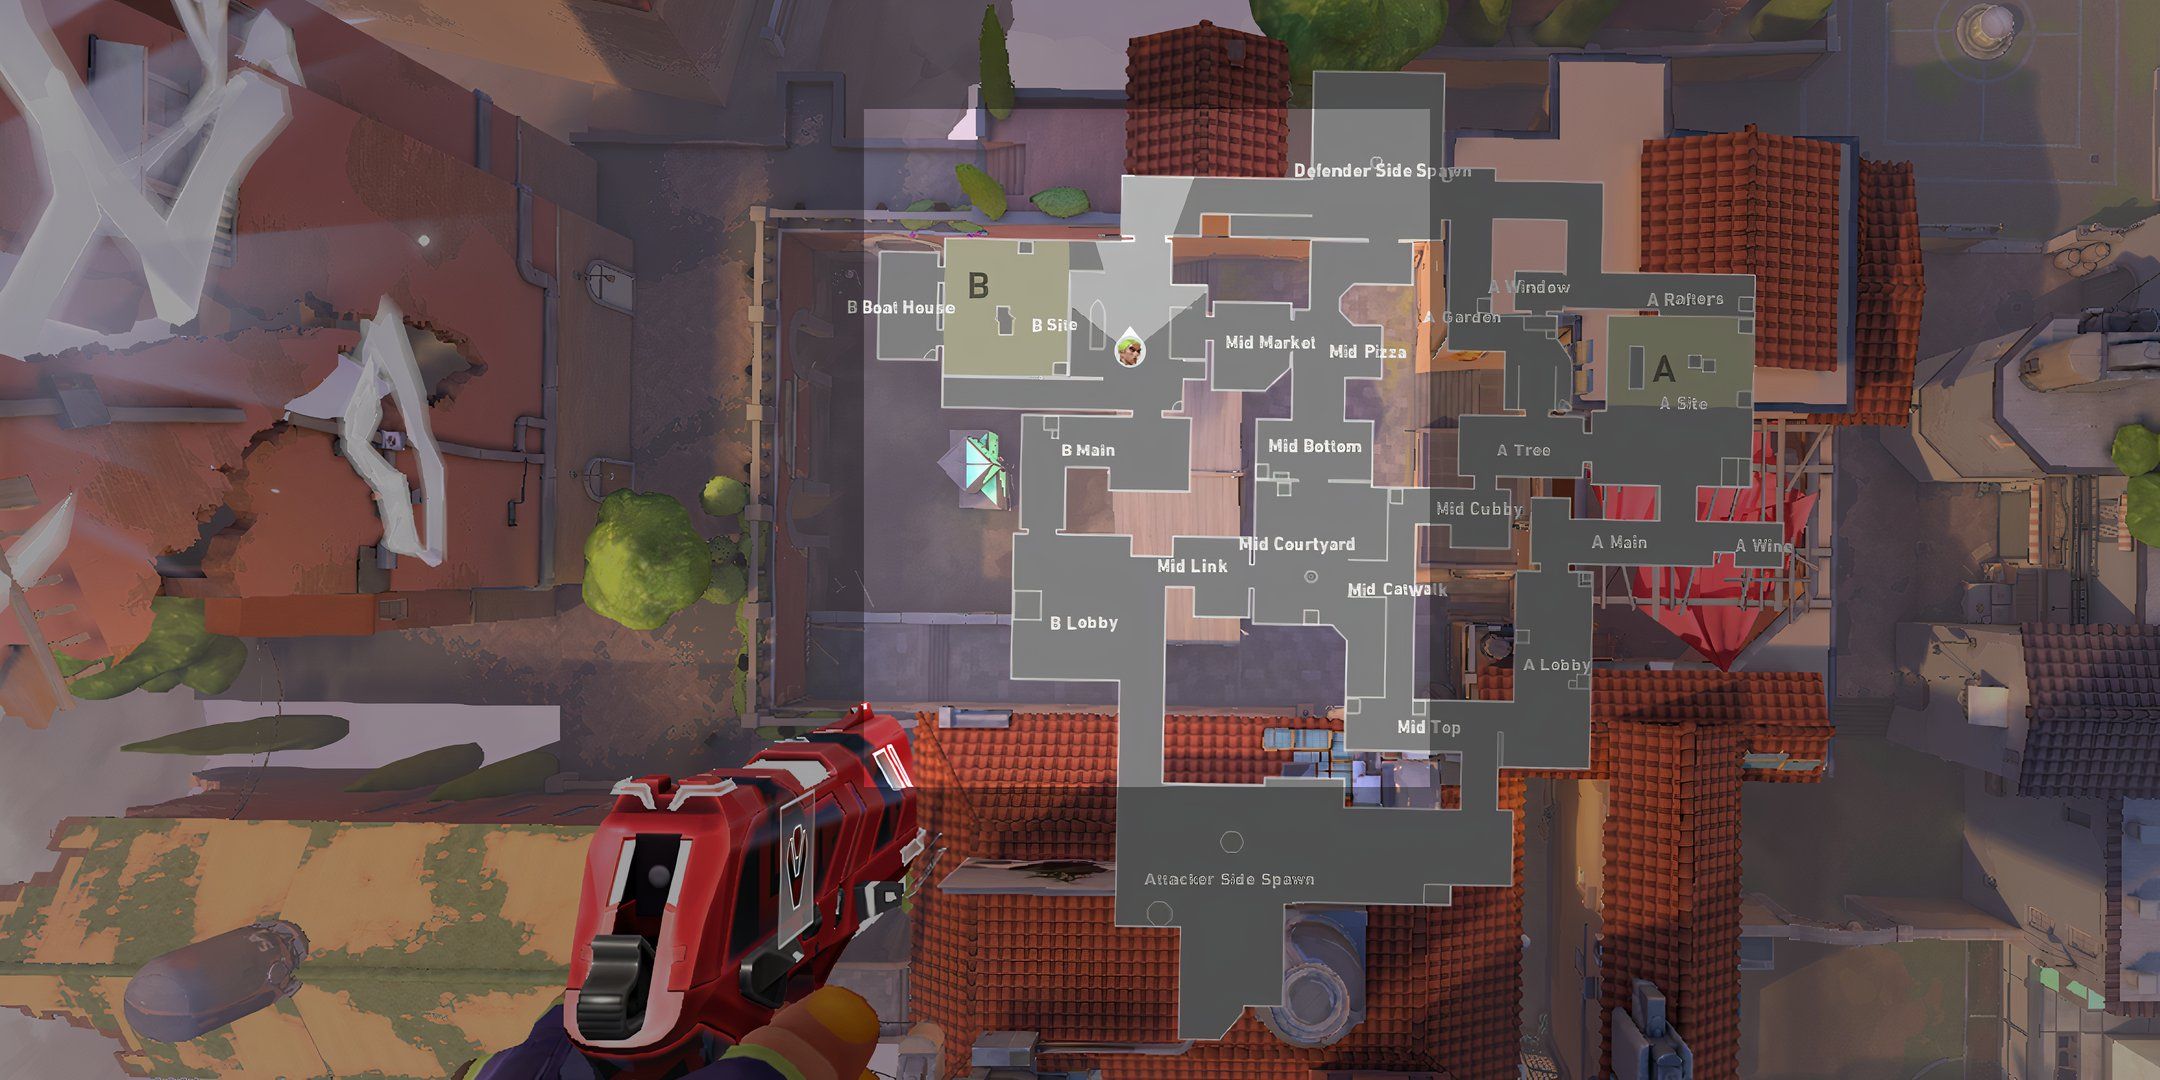
The floating map of Ascent is a representation of the Valorant Protocol’s failure to stop a lethal Spike detonation in Venice, resulting in a huge chunk of the city to float and become one of the more popular maps in the FPS title. As a Valorant map, Ascent is known for its dual-Site structure with a decently-sized Mid-Area and quite a lot of corners ripe for creative execution.

AimLabs: 8 Best Valorant Routines
AimLabs is the perfect way for Valorant players to improve their skills. Here are the best routines to focus on.
Fans who want to master core Valorant mechanics are encouraged to play in Ascent, as both its vertical and horizontal elements incentivize the full utilization of any Agent’s kit. Players who learn how to sync their Agent abilities with tight corners, unsuspecting rooftops, and even bounceable walls can create lineups that pave the way for incredible wins — and frustrating defeats for opponents. With all maps now available in Unrated and Swiftplay in v8.11, this guide details how players can achieve mastery in Ascent.
Ascent: Strategy Over Messy Gunplay

Situated in Venice, Ascent in the lore is one of the maps that gave signs of an existing parallel reality — Omega Earth — that the VALORANT Protocol is eventually assigned to investigate. In the game, Ascent is a standard two-Site map with its fair share of engaging corners and a relatively open but contained Mid-Area. This particular area provides incentives for players who can properly check corners and pre-fire contested angles, but even more incentive for players who can outwit foes through countering favorable strategies.
Predictable With Some Wiggle Room For Strategy

Due to the straightforward nature of Ascent, many players complain that its Valorant gameplay has become fairly predictable — making gunplays more favored when contesting popular locations. However, it’s precisely due to the map’s predictable nature that players are challenged to spice things up with proper skill usage, adding a much-needed strategic layer to outwit and outmaneuver opponents regardless of their position. Some key map notes include:
- Closing Bomb Doors: Both A-Site and B-Site have Bomb Doors that can be closed, giving an extra wall that enemies have to shoot, giving away their location. They are located near B-Market and A-Tree, both side entrances to their respective Sites.
- Split-Push Incentives: Both Ascent Sites have one common entrance and a Mid-Area entrance, encouraging split-pushes from Attackers and more focused Site security on the part of Defenders.
- Mid-Area Contest: Due to the relative accessibility of Sites from Mid, it’s easy for Mid to become a battleground for extra security. Whether Attackers decide on a hard push or a split-push, almost no one can flank unless they clear either side’s long-distance Mid-Area Agent.

Valorant Redeem Codes (July 2024)
Here, you will find all of the active codes for Valorant, including instructions on how to exchange them for in-game rewards.
Mid-Area: Fair Game For Gunplays

Unlike other Mid-Areas in other Valorant maps, Ascent’s Mid-Area is known for its facilitation of relatively fair fights on both sides. Being able to access common peek zones from B-going-Mid and A-going-Mid from either side means it’s fair game for gunfighters, with utility usage and area control often becoming the determinant on whose side controls Mid.
Easy Peeks Make For Quick Deterrents

It’s common Valorant gameplay knowledge that seeing even one enemy close to one Site implies the possibility of a push or a flank, and Ascent’s Mid-Area makes this possible with its accessible but defensible peek locations. Areas of interest include:
- Mid-Top: This is a well-protected corner that can facilitate counter-peeks from Defenders at Mid-Bottom or Mid-Cubby.
- Mid-Courtyard: Destructible Doors separating Mid-Courtyard from both Mid-Top and Mid-Cubby can allow Attackers hard-pushing B-Site to secure Mid-Area defense efficiently, either by camping here to attack flanks or by eliminating long-ranged Defenders assigned to Mid.
- Mid-Catwalk: Assuming no one from B-Site is holding Courtyard, Mid-Catwalk can become quite a sneaky pathway to flank A-Site Attackers or catch A-Site Defenders unawares.
Offense: Secure Mid For Alternate Push

Given how Mid-Area can conveniently access either A-Site via A-Cubby or B-Site via B-Market, Attackers contesting mid should secure it for an emergency alternate route in their Valorant gameplay. Should the team encounter a hard-B or hard-A setup, the Attacker assigned to Mid-Area can eliminate pesky flanks and facilitate safe passage to the alternative location. Locations of interest include:
- Mid-Top: A popular Attacker spot in Mid-Area Acent is at Mid-Top that gives long-distance shooters an advantage to capitalize on snipers and Vandals to eliminate Mid-Bottom, Mid-Cubby, and Mid-Courtyard pushers.
- Mid-Catwalk: A threatening Mid-Top combatant can discourage Mid-Cubby defense, allowing another Attacker to traverse Mid-Catwalk safely for a surprise entry into Mid-Cubby going to A-Tree.
- Mid-Courtyard: A hard-push into B-Site often means an Attacker’s Mid-Area assignee has to clear Mid-Courtyard. They can use the doors to safely peek into Mid-Top, Mid-Cubby, and Mid-Bottom to distract opponents.
Defense: Mid Attackers Give Away Site Preference

The long distance between Sites in Ascent makes it unfavorable for an Attacker assigned to Mid to be so far out just to secure this area. This means spotting a Mid-Area Attacker will give away the team’s Site preference as the location they’re closest to. In turn, Defenders should pay attention to these areas:
- Mid-Cubby: The proximity of Mid-Cubby into A-Site makes this the best location for defending A-Tree while attacking anyone in Mid-Courtyard. Quick peeks to provoke enemy fire can give hints about whether the opponent is in Courtyard or Top, giving away a likely enemy team location.
- Mid-Bottom: Defenders in Mid-Cubby are likely preoccupied with a Mid-Cubby Attacker, leaving Mid-Bottom open to check anyone trying to cross Mid-Catwalk via Mid-Top. This also defends B-Market while giving easy access to Defender Side Spawn into either A-Site or B-Site.
- Mid-Plaza: Arguably the best spot for Controllers who set up smokes. This facilitates quick rotations to a contested Site and jump the gun on Attackers trying to take B-Market.
A-Site: Open Site Demands Extra Area Control

Entering A-Site in Ascent can give players the impression of a standard FPS bomb site, complete with a few corners to check, a relatively open planting area, and a reasonable height advantage for Defenders. Extra aggression on part of the Attackers can easily secure A-Site, whereas an equally-aggressive defending team can lure Attackers to try and go to B-Site for a harsh Mid-Area punishment.
Open Site, Multiple Retake Corners

The most prominent feature of A-Site in Ascent is its open nature, as it only takes going through a small flight of stairs to plant the Spike anywhere in the planting zone. However, the Site does have some notable components for creative Valorant plays:
- A-Hell: Located below A-Rafters, A-Hell is a popular defensible zone as it’s protected by two walls that can see to A-Generator or even its opposing open wall. Its only vulnerability is its ceiling or Rafters’ flooring, as it is penetrable by bullets.
- A-Tree: This is the location of the A-Site Bomb Doors, which is usually closed by Attackers who plan on taking the Site for the plant.
- A-Generator: This large structure blocking a majority of the Site’s view (except the doorway of A-Tree) makes it a popular Spike planting zone.
- A-Wine: This corner tucked at the end of A-Main is a popular rat spot for both Attackers and Defenders, as they have a good view of both A-Main and A-Site proper.
Offense: Secure Tree And Rafters For Hard Pushes

Regardless if Attackers manage to access A-Site via A-Tree or A-Main, it’s usually over for Defenders once enemies get a clear view of A-Rafters and the rest of the Site. Speed is the key for securing A-Site, as it’s also relatively easy to defend on the retake with its many defensible angles. Here are locations to consider:
- A-Main: The raised platform at the end of A-Lobby is perfect for Agents with vertical movement options (Omen, Jett, Raze, or anyone on a Sage Wall), as they can camp here and attack anyone who peeks from A-Site.
- A-Wine: A team that breached A-Main can have someone hide in A-Wine to eliminate flanks who want to try going into Mid directly from A-Main. When entering, a Controller can stay in A-Wine to protect the Spike while the team gets into post-plant.
- A-Site: Assuming the team cleared traps blocking A-Site proper, the location is ideally secured via a three-person entry. This allows the team to check A-Rafters, A-Tree, and immediate corners to the right for lurkers among Defenders.
- A-Tree: Aside from clearing A-Site and attacking anyone in A-Tree, an Attacker assigned to this location can lock down the site by accessing the Bomb Door. Alternatively, Attackers pushing from Mid-Catwalk can clear A-Tree of any unsuspecting Defenders before pushing into Site or camping for anyone going to A-Rafters.
- A-Garden: A more aggressive Defender can also choose to hang out in A-Garden instead, as this gives them quick access to A-Window and A-Tree, as well as a decent view of anyone trying to get into A-Site via the Defender Side Spawn — a tactic often used by retakers from B-Site.
- A-Hell: This becomes a popular defensible position post-plant, as a Defender still has to clear both sides of this location before having access to the Spike. The only weakness of this position is an attack from both its left and right sides.
Defense: Protect Main And Cubby To Destabilize Entries

Due to the vulnerabilities of A-Site being prone to aggressive pushes, Defenders need to be able to secure the location as soon as they detect enemies in their Valorant match. In this regard, zones to protect in Ascent's A-Site include:
- A-Rafters: Due to its proximity to other traversable parts of A-Site, A-Rafters is a common area for Defenders trying to stop the enemy from entering the Site. Aside from gunfight lovers, players with long-distance utility will likely be able to secure detections and other effects via A-Rafters.
- A-Main: The area parallel to A-Main inside the Site can help Defenders hear enemies trying to walk in this location. Their access to A-Site from here allows them to take up the necessary defensive positions before their entrance, be it by smoking the entryway, placing traps, or triggering mollies.
- A-Site: The main Site has a lot of defensible areas for players, including the crate to on the far-right close to the entrance (Attacker side) for crouching Defenders as well as behind cover such as A-Generators and A-Hell.
- A-Window: A hard push towards A-Main will likely mean an opponent will try to get access to A-Tree, be it via A-Cubby or straight from the A-Main entrance. Hiding close to A-Window can give Defenders cover against anyone trying to breach A-Cubby as well as access to A-Rafters for the retake. Opponents who try to get access to Rafters have to break the Glass Window, giving away their attempt to Defenders.

Valorant: Tips To Defend
Players looking to improve their defensive game in Valorant should heed these essential tips.
B-Site: Closed Downwards Site Needs Location Mastery
 Compared to the more open A-Site, the B-Site of Ascent is characterized by its cramped pathways and a planting zone located at the far end of the Site proper. B-Site is more favorable for Defenders due to its provision of many corners and an isolated planting zone, but this advantage sways over to Attackers if they manage to secure the Site with the right Valorant Agent abilities.
Straightforward Security
 Whereas the A-Site of Ascent leans toward more action-packed entries due to how A-Main lines up to the middle of the actual location, B-Site in Ascent sways towards the defensive with how cramped the area can become. Valorant players can hold B-Site much more easily, as the corner near B-Main can be secured by traps and a flank, while the resident gunfighter can defend the more open B-Market. Other considerations include:
- Bomb Switch: The Bomb Switch for Mid-Market is located in the stall in front of it, inside the Site. This means an Attacker can isolate a Defender as soon as they enter, provided they reach it first.
- B-Site: The downward B-Site contains a corner that can be difficult to secure, assuming another ally is in B-Boat House, forcing pursuers to perform a split push to clear the Site proper for either planting or post-plant defuse.
Offense: Anticipate Common Trap Locations

A lot of complaints regarding Ascent’s predictability come with common defensive measures placed in B-Site. Its tight B-Main entrance and heavily contested Mid-Area can force Attackers at a disadvantageous entry, making it easy for Sentinels like Killjoy and Cypher to abuse their traps in the location. However, there are workarounds to such a situation assuming players know how to play off the Site’s key areas:
- B-Main: Entering B-Site from B-Main can be a no-brainer for Attackers — assuming they actually commit to the push, as hiding spots are often common in the location. Taunting the Defenders with a recon can force them to hide in spots such as the corner to the left of B-Market (the right of B-Main, Attacker view), the immediate side parallel to B-Main (to the left, Attacker view), as well as B-Market and Defender Side Spawn. Pre-firing these locations can take down enemies easily, assuming players are also able to eliminate traps in the location.
- Mid-Courtyard: Despite its location in Mid-Area, Attackers can utilize Mid-Courtyard’s position close to the B-Site as their Mid-checker. Lurks and flanks can use Mid-Courtyard to clear any spotters from Mid-Top and Mid-Cubby, as they are likely the ones able to flank Attackers during a hard-B push. After doing this, an Attacker can then eliminate enemies in Mid who are trying to exit Mid-Market for an alternate route on the retake.
- B-Site: Traversing the pathway parallel to B-Main leading to the Site will likely only have traps close to the entrance and not the actual planting zone. Attackers who manage to go down without a trap going off should anticipate them in the actual Site, making it much easier to clear the zone for planting.
- Defender Side Spawn: When Attackers go full-blast entering B-Site, Defenders from Mid-Market will likely retreat and find another entrance for the retake. Due to distance constraints, this is likely the entrance from Defender Side Spawn. This factor makes the area an ideal spot for clearing upon entry and locking down post-plant.
- B-Boat House: If there are only a few Defenders in B-Site, they may likely be situated in B-Boat House, making this a must-check area. Upon planting, the size of Boat House also makes this a decent defensible position to hold and delay Attackers.
Defense: Take Advantage Of Cramped Corners

The natural defensible nature of B-Site can make this part of Ascent a playground for trapping specialists in Valorant, particularly Sentinels such as Cypher, Killjoy, and Deadlock, whose traps can detect and destabilize opponents for quick kills. While it can be terrifying to defend B-Site from an extremely aggressive Attacking team, there are ways to take advantage of the location’s cramped corners:
- B-Main: The corner next to the doorway of B-Main is a ripe spot for creative trap placement, which is also why Raze and Jett users are encouraged to jump their way past them. Players can anticipate this by placing traps in their likely landing zones, or other hot spots such as the Bomb Switch.
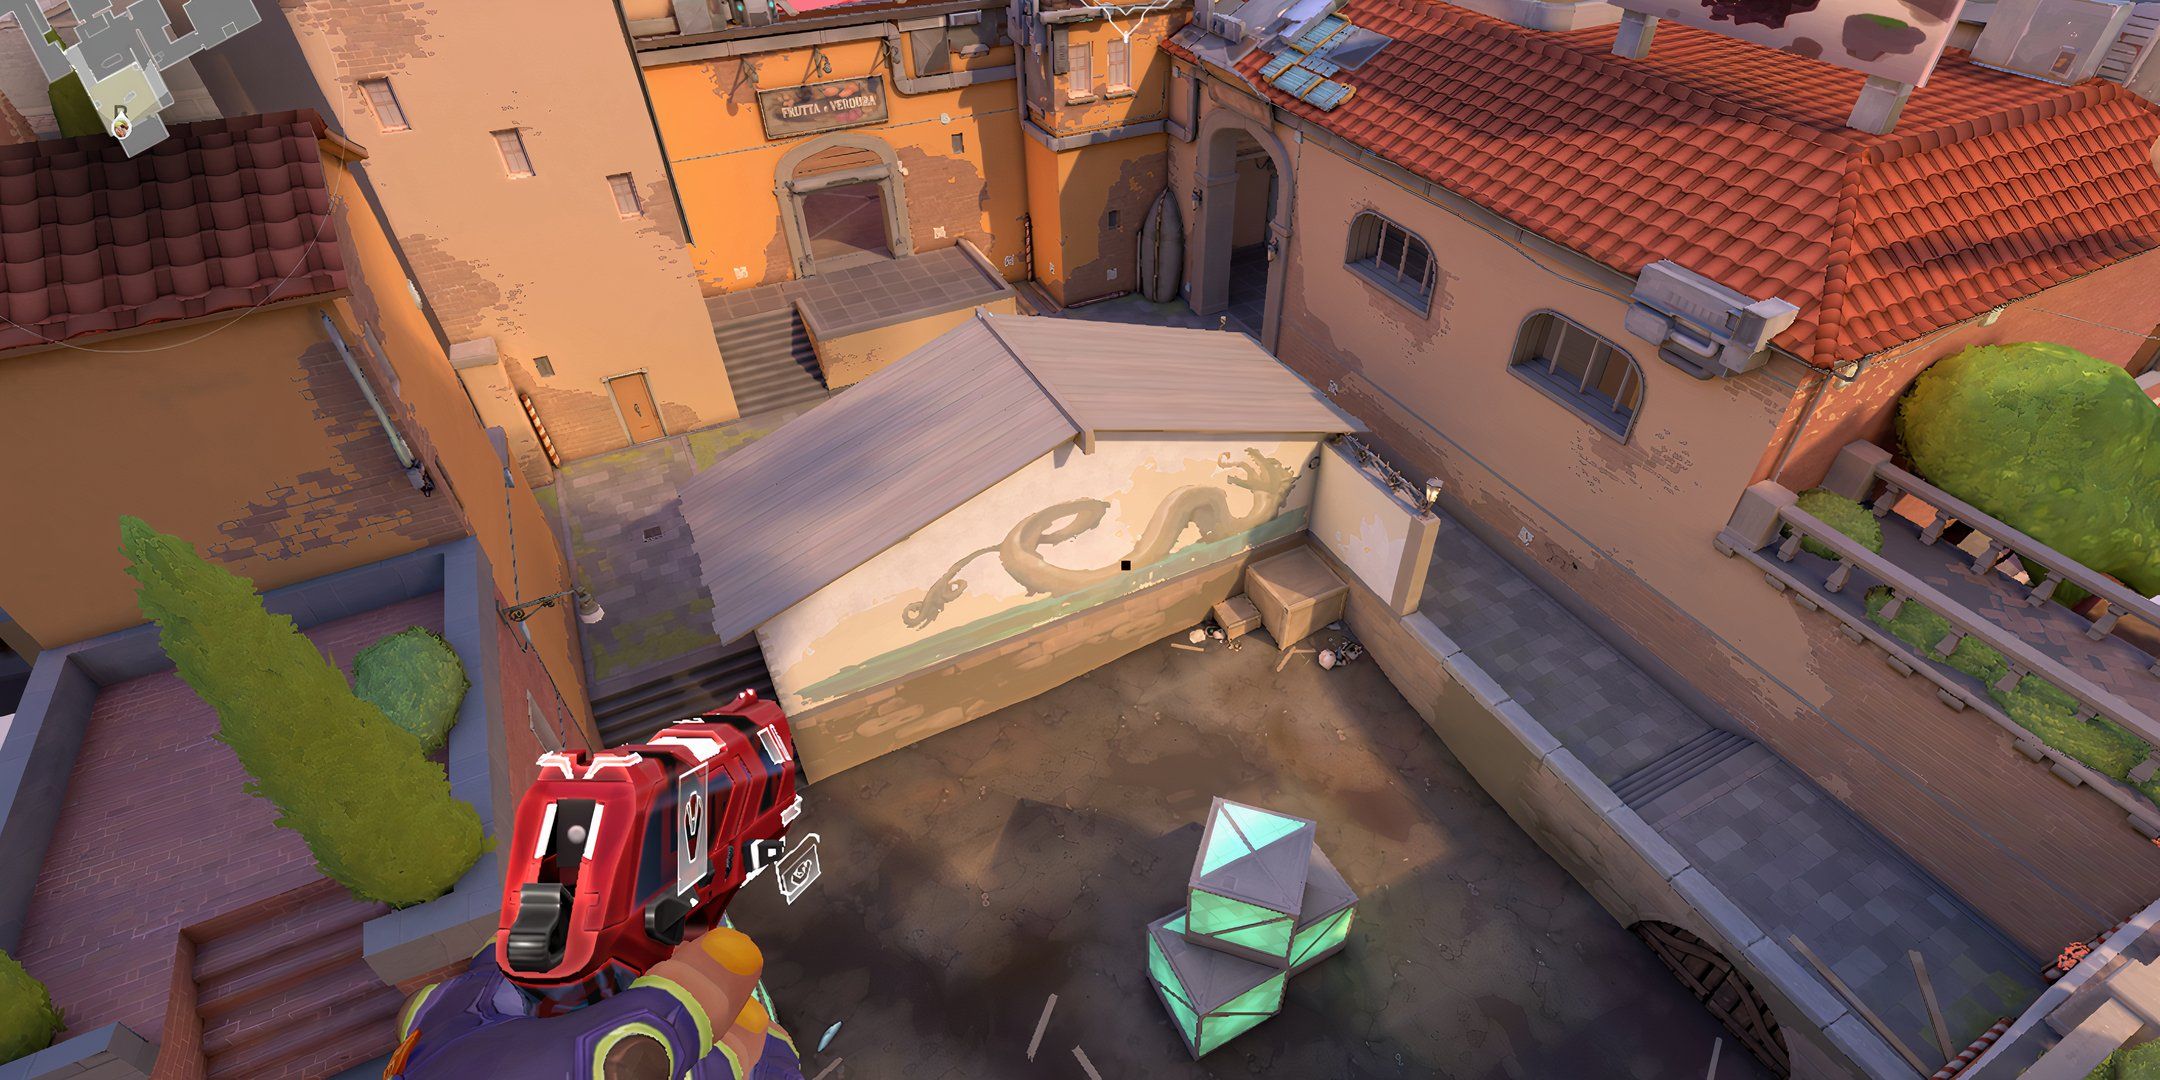
- Penetrable Wall: There is a spot parallel to B-Main on the Defender side with a marker of an animal. This is a passable wall, allowing an Ares or an Odin to spray through opponents who are detected on the other side. However, be warned that this goes both ways, so an Odin user from the other team can also use this to eliminate anyone who wants to surprise them from this corner.
- Mid-Market: The proximity of Mid-Market to B-Site may as well make it a part of the side in question. Its access to safe corners allows players to retreat inwards should Attackers overwhelm with their entries, while gunfighters can make early kills with the proper peek and pre-fire.
- B-Boat House: The rush in securing B-Site means not everyone can check the Site properly, especially Boat House. A Defender can hide inside Boat House while another ally hugs the corner of the wall in front of it, forcing enemies to check two angles by the time they enter Site.
- Defender Side Spawn: The corner from the Defender Side Spawn directly faces B-Main, encouraging firefights between players if the locations are not smoked. Defenders can enter from this location and hide on the adjacent wall just before the stairs to B-Site, allowing them to pick off enemies from B-Main with the relative safety of cover.
Best Agents: Take Advantage Of Corners And Vertical Objects

Despite the straightforward nature of Ascent as a map, gameplay is most fun with Agents who can take full advantage of its physical features. Its tight corners can become perfect spots for traps and pre-fire experts, while its verticality can be abused by those who can teleport or jump high enough to lurk on them. In turn, Valorant Agents who excel at controlling spaces and making minute mobility adjustments can make for excellent Ascent combatants:
- Omen: Access to many vertical spaces and tight corners can become Omen’s playground, especially with properly placed Dark Cover to create critical one-ways to eliminate foes. Paranoia can become Omen’s go-to choice for a pre-entry blind, while he can also instantly Shrouded Step behind enemies or inside smokes to surprise foes. Perhaps most important to his kit is From the Shadows, as the Ultimate allows him to teleport to crucial map zones without having to worry about traversing an open Mid or the long-winded base route to another Site.
- Sova: Ever the dependable Initiator, Sova’s bouncing arrows are perfect for Ascent’s corners. Aiming the Recon Bolt properly can find enemies close to Site entrances and far into enemy bases. Meanwhile, the Owl Drone is a decent corner-checker for up-close entanglements. Players who study angles properly can use Shock Bolt lineups to deal damage on crucial corners and even secure the Site without having to be seen.
- Jett: Ascent, having tunneled entrances to open Sites and a wide Mid-area, can become the perfect playground for Jett’s movement mastery. Jett can enter sites quickly with Cloudburst and Tailwind while securing corners. Likewise, the right combination of Updraft and Drift can give Jett the aiming advantage when contesting locations, as aiming at her upwards leaves enemies open to backup below.
- Killjoy: Ascent’s many corners and wide-spaced Sites are perfect for Killjoy’s slate of deployables. Despite Turret’s limited viewing cone, Killjoy can rely on this stationary bot for extra damage and angle clearance. If she has the time, Killjoy can detect intrusions with Alarmbot, secure common planting areas of the Spike with the damaging Nanoswarm, and even dominate Site control with Lockdown.
- KAY/O: When thrown correctly, Zero/Point can detect enemies behind entrances and close to critical corners across both Attack and Defense. The same goes for corner-checking with Flash/Drive flashes, as KAY/O can pre-fire common hiding spots while enemies struggle to reposition. Frag/Ment can secure areas with extra damage, while NULL/CMD can destabilize a site’s defenses for a solid entry or retake.

Valorant
- Released
- June 2, 2020


WHERE TO PLAY


- Developer(s)
- Riot Games
- Publisher(s)
- Riot Games
- Platform(s)
- PC, PlayStation 5, Xbox Series X, Xbox Series S
- Genre(s)
- Shooter